


“Here to Help” is a support column written especially for Formstack’s awesome, loyal customers.
Authorize.Net is one of the most trusted names in online payment processing. When you combine this popular payment gateway with an online form builder like Formstack, you can create powerful payment forms that process online orders, collect registration fees for events, gather monthly subscriptions, and much more. However, integrating the two platforms can be a bit tricky if you don’t know the basics. Working with the Authorize.Net gateway requires a basic knowledge of field mapping, handling different payment types (like recurring payments, single-item payments, and multi-item payments), and knowing a bit about Routing Logic. To help you use the Authorize.Net integration, I’ve broken down all the essential information for you. Ready to dive in? Here’s what you need to know to create seamless payment processing between Formstack and Authorize.Net:
Why Formstack?
You might be wondering why you need Formstack to accept payments online when Authorize.Net provides its own hosted payment form. The reason is simple. Formstack provides more form-building options, including custom branding, multiple question types, and calculating fields. These options allow you to create customized, responsive payment forms that suit the particular needs of the buyer. Need to sell tickets to your event? Add an Event field that will calculate quantities and final totals for ticket purchases. Want to set up a monthly subscription for your service? Add a Credit Card field to your form to collect fees. The possibilities are endless, and they all lead to a better buying experience for your customers.
Authorize.Net Integration Basic Setup
To integrate a Formstack form with the Authorize.Net gateway, follow these quick steps:

- Once in the chosen form, go to Settings > Integrations > Payments, and click the Add button below Authorize.Net.
- This will create an Authorize.Net tab under the Integrations tab, and you will immediately be directed there to enter your API Login ID and API Transaction Key. To find these credentials, log into your Authorize.Net account, click on Support, and then click on Account > Settings > Security Settings > API Login ID and Transaction Key.
Mapping Form Fields to Authorize.Net
Authorize.Net is an on-form payment processor, which means you must have a Credit Card field and at least one field that contains a price value (like a Number field) on your form. You can also send other types of information to the Authorize.Net gateway, like shipping information, card verification codes, and customer details.To map form fields to Authorize.Net, follow these steps:
- Under the Payment Information section, use the dropdown menus to map Card Number, Expiration Date, and Card Verification Code to the Credit Card field on your form.
- In the Customer Information section, use the dropdown lists to map details like name, address, and email to the corresponding fields on your form.
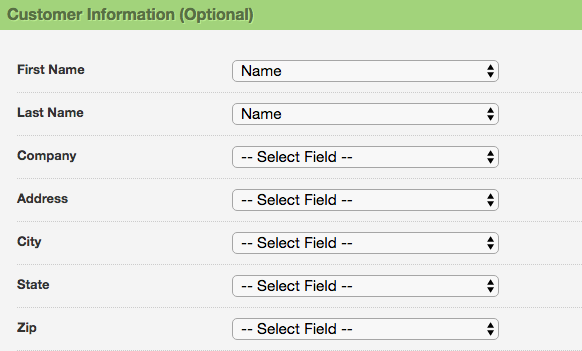
Mapping form fields in this way will ensure that important bits of information get passed to your Authorize.Net account.
Setting Up Recurring Payments
If you want to create a subscription service, you can set up your Authorize.Net payment form to accept recurring payments.
Note: You must sign up for Authorize.Net’s ARB service to use recurring billing.
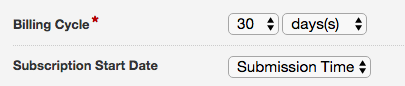
To set up recurring billing, go to the Transaction Information section in your form’s Authorize.Net integration settings. Under Type, click on Subscriptions. You will then see a variety of options you can use to customize your subscription service. These options include:
- Type: Use this to name your subscription service and assign it to a specific field on your form.
- Billing Cycle: Choose how many days should pass before the customer is billed again. For example, if you want customers to be billed monthly, choose a 30-day cycle.
- Subscription Start Date: Choose whether you would like the subscription to start upon submission or on a specific date.
- Trial Period: This option lets you create a trial (either free or paid). When you choose this option, you can also choose how many times the trial may occur.
- Total Occurrences: If you want the subscription to be indefinite, choose Infinite. However, if you want the subscription to occur only a few times, then choose the appropriate number. For example, if you want recurring billing to last for a year, choose 12.
Note: Recurring Payments do not happen in real time. They are processed at around 2:00 AM PST on their scheduled payment dates. Therefore, the first scheduled transaction will not be sent to the customer's bank for authorization until 2:00 AM PST on the start date that you specify. If you create a start date equal to the creation date, the first scheduled payment will not process until after 2:00 AM the following day.
Single-Item vs. Multi-Item Payments
If you want to sell products on your form, you can choose to create single-item or multi-item payments. Setting up payment processing for a single-item transaction is easy. All you need to do is go to the Transaction Information section, choose Products and Services under Type and Single Item under Item List. You can then give the item a description, map it to the correct field on your form, and include necessary shipping charges and tax.The same steps can be taken to create multi-item payments after choosing Multiple Items under Item List. To add multiple items, just click on the green plus sign and add the appropriate details for each item.

Note: If you choose to map to multiple items, each item with a price needs to be in its own separate field with its own quantity field if applicable.
Submit Actions and Routing Logic
If you want to include multiple payment options on your form, it helps to know a bit about Submit Actions and Routing Logic. Submit Actions are actions that take place after a form is submitted, and Routing Logic is a feature that lets you redirect people or information to different websites or payment processors if certain criteria are met. For example, if you want to provide a Pay With Check option on your form, you can use Routing Logic to make sure users are redirected to the appropriate place depending on which payment option they choose.To do this, go to Settings > Emails & Redirects and scroll to the After the Form is Submitted section. A Submit Action should already be there called Submit to Authorize.Net. You can add Routing Logic to this Submit Action if you only want to send people to Authorize.Net if they choose Credit Card instead of Check on a Payment Type field you’ve added to your form. You can learn more about setting up multiple payment options here.

Additional Information
- Please be sure to properly map all form fields to their corresponding options in the Authorize.Net integration. Otherwise, the integration will not work properly. Required fields include API Login ID, API Transaction Key, Price, Card Number, and Expiration Date.
- Once you’ve finishing mapping fields to the Authorize.Net gateway, you'll also need to adjust your security settings since you are accepting payment information on your form. SSL must be enabled under Settings > Security, and if you're storing the credit card number in the Formstack database (not recommended, but optional in the Authorize.Net integration settings), you need to enable Data Encryption as well.
- When setting up prices, the value must be greater than 0, or the Authorize.Net integration will fail. If you need to accept submissions with $0 as the price, you'll need to add Routing Logic to your Authorize.Net Submit Action.
Not sure Authorize.Net is the payment processor for you? Check out and take our payment gateway comparison.

