


“Here to Help” is a support column written especially for Formstack’s awesome, loyal customers.
If you find yourself in the event planning boat, Formstack can help. We have several features that are great for event planning, but one of our most useful is the Event field. Adding this handy form field to one of your event planning forms lets you quickly set up prices, organize ticket quantities, and add settings that make it easy to shut down your form when available quantities have sold out.Sounds great, right? Read on to examine the Event field more closely and learn how to set it up on your own form.
Event Prices and Ticket Quantities
Setting up prices and available ticket quantities for the Event field is super easy. You’ll want to take full advantage of the options available to you. Not only can you set up ticket prices (or make events free), but you can also enter the total amount of tickets available and decide how you want to shut down the form if that total is reached. Just follow these steps to get started:

- Add the Event/Product field to your event planning form by dragging it over from the Advanced Fields section on the left-hand side of the builder.
- In the editor that opens up on the left, scroll down to Charge Type and choose whether the event will have a fixed price or be available for free. If you choose Fixed Amount, you will be able to enter a ticket price.
- Scroll down to Tickets Available and choose Limited if you only have a limited number of tickets on hand. A box will open up letting you enter the total number of tickets.
- If you want to limit how many tickets a person can buy per submission, scroll down to Tickets per Submission and choose the appropriate range.
Finally, you can also choose what will happen when all available tickets have been sold out. You have three options in the When Sold Out section:
- Hide event on form: This will hide the Event Field on the form when tickets are sold out.
- Mark event as sold out: This will mark the Event Field as sold out so new submitters will see that the event is no longer available.
- Show a waiting list option: This will allow users to add themselves to a waiting list in case new tickets become available.
These options are highly recommended for improving event logistics and saving the hassle of selling more tickets than are actually available. Always use these options if you have limited event capacity!
Customizing the Event Field
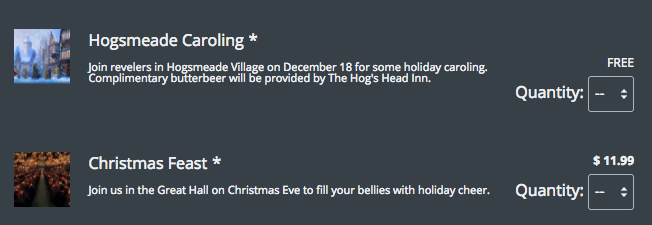
You can take the Event field a step further by customizing the image and description to your liking. This can help you stay on brand and garner a bit more interest in your event.
To customize your Event field, follow these steps:
- Click on the Event field to open up the editor on the left-hand side.
- Find Image and upload the image you would like to use for that field.
- Find Description and enter in the text you want to use for the event.
Note: You can add multiple Event fields to one form. This works great if you want to plan ahead and gather reservations for events that will be happening throughout a given year. If you do this, customizing each field with its own image and description will help people distinguish between events and decide which ones they want to attend.
Want to make event planning even easier? Use one of our event form templates to make building your event planning form a breeze. Click to find a variety of templates to check them out.

