


"Here to Help" is a support column written especially for Formstack's awesome, loyal customers. Post last updated July 12, 2022.
Combining an easy-to-use form builder like Formstack with a robust customer relationship manager (CRM) like Salesforce allows you to create a powerful data management machine. But constructing this machine can be more than a little complicated.
Working with Salesforce requires knowledge of object mapping, email rules, upsert functionality, and more. To demystify the Formstack Salesforce integration, I’ve broken down all the essential information for you. Ready to dive in? Here’s what you need to know to seamlessly connect Formstack and Salesforce:
Why Formstack?
You might be wondering why you need Formstack when Salesforce offers options for creating Web-to-Lead, Web-to-Case, or Web-to-Anything forms. The reasons are simple. Replacing your Salesforce forms with Formstack forms gives you more control over your forms, prevents spam, and uses client-side validation. It also gives you access to helpful Formstack functionality, such as Routing Logic, customized messages, and multiple redirect URLs.
Learn More: 4 Notable Limitations of Salesforce Web-to-Lead Forms
Salesforce Integration Basic Setup
To integrate a Formstack form with Salesforce, follow these quick steps:
1. Once in the chosen form, go to Settings > Integration Hub > Customer Relationship Management, and click the Add button below Salesforce.
2. This will create a Salesforce tab under the Integration Hub tab, and you will immediately be directed there to copy your Salesforce credentials from another integrated form or manually enter your username, password, and security token.
Introduction to Objects
Once your credentials have been added, a dropdown list of objects from your Salesforce account will populate.

Objects represent Salesforce database tables that contain your organization's information. Objects already created for you by Salesforce are called standard objects while objects you create are called custom objects. Once an object exists or has been created in Salesforce, it can be added to the Formstack Salesforce integration settings for mapping from the form. You can add multiple objects to your integration settings and remove them at any time.
Mapping Objects
When you choose an object from the dropdown list in the Formstack Salesforce integration settings, the fields for that object will appear, and you can map the fields on your form to the fields in Salesforce. There are four options available for mapping form fields to Salesforce objects: Field, Value, Lookup, and Link.
1. Field
This option is used strictly for mapping fields from the Formstack form to the objects in Salesforce. Once Field has been selected, the dropdown list on the right will show all fields on the form that can be linked to the object. Currently, there is no option to map multiple form fields to a single object in Salesforce.

2. Value
This option is used to link a Salesforce object to a specific value, such as an account ID. Once Value has been selected, you can enter a specific object value in the available box. The value must exist within Salesforce and be an exact match to the Salesforce value, so it’s best to copy and paste to avoid any unintentional typos that will result in errors. When the Formstack form is submitted, the object will be linked to the value entered.

3. Lookup
Given a parameter to look for and a mapped field to send data to, this option will attempt to find an already-existing Salesforce object to associate a relationship field (Owner ID, for example) into. The first dropdown list that appears contains the types of Salesforce objects that can be looked up along with the specific object field to attempt the look up. The secondary dropdown list contains the form fields that the lookup value data can be mapped into.

4. Link
This option is strictly for connecting one upserted/created object to another upserted/created object. Both objects must be modified or created when the integration runs (on submission) in order for Link to be an option; otherwise, you will need to use the Lookup option. Additionally, links can only be made in one direction, and you can’t use triangle links (e.g., links from lead to campaign to account and back to lead).

Updating (Upserting) Records
If you integrate your Formstack form with Salesforce, you can update existing records via Saleforce’s upsert feature. This feature allows you to avoid unwanted duplicates when data is submitted to Salesforce from a Formstack form. For example, if you include an Email Address field on your form and check the Upsert option in the Salesforce integration settings, any record already linked to that email address will be updated. If you don't check upsert, a new record will be created upon each submission.

Note: Not all fields use the upsert feature in the Formstack integration settings. This option is determined by Salesforce, and there is currently no way to force an object to upsert through the Formstack app.
Email Options
The Formstack Salesforce integration includes a series of email options that can be enabled depending on how you want to automate your organization’s processes for object generation and support.
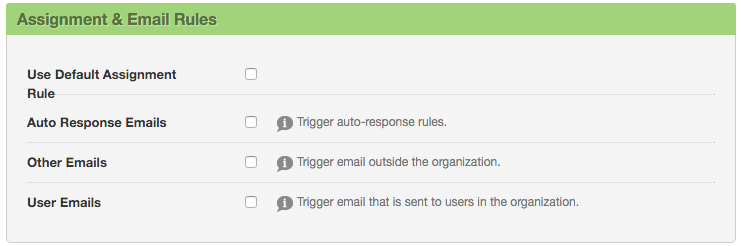
Here is what the various options provide:
- Use Default Assignment Rule: This setting ensures that any assignment rules (such as "assign all new contacts to John") run when the Salesforce objects are created.
- Auto Response Emails: This setting determines whether auto-responder emails for object creations (typically leads or cases) are sent when the appropriate objects are created.
- Other Emails: This setting checks if emails that should be sent outside the organization are sent. These emails are generally sent when creating, editing, or deleting a contact for a case.
- User Emails: This setting confirms that emails that should be sent to users inside the organization are actually sent. These emails are typically sent when resetting a password, creating a new user, adding comments to a case, or creating/modifying a task
Additional Information
- To use Formstack’s Salesforce integration, your organization must use the Performance, Unlimited, Professional, Developer, or Enterprise editions of Salesforce. Also, it is recommended that you create an API-only user at Salesforce and that you create a security token to use with the API.
- If you are sending file attachments to Salesforce, you must store your data in the Formstack database or those files won't be transferred. For more information on adding attachments to your Salesforce integration, check out this blog post.
- Some common errors you may experience when setting up and using the Formstack Salesforce integration are detailed in this Support article. Note that there is an “Error Handling” section in the integration settings that allows you to insert your email address to be notified if a submission fails to post to Salesforce due to a Salesforce related error.
Want to learn more about connecting your forms to Salesforce? Click here to check out our quick-click glossary on all things Formstack + Salesforce.

