


"Here to Help" is a support column written especially for Formstack's awesome, loyal customers.
If your company uses both Salesforce and Formstack, you probably know that it’s possible to connect the two tools through Formstack’s Salesforce integration. This integration allows you to collect information via a Formstack form and then pass the information to Salesforce. But, like many relationships, the connection between Salesforce and Formstack can be a bit complicated at times.To provide some clarity around integrating your forms with Salesforce, I’m here to answer some of your top questions. Here are four frequently asked questions (and answers!) about the Formstack Salesforce integration:
#1: How do we send file attachments between our forms and Salesforce?
Easy! First, be sure you have at least one File Upload field included on your Formstack form. Next, add an Attachment object through the Formstack Salesforce integration settings by selecting Settings > Salesforce > Objects > Select Object > Attachment.With the Attachment object added to the integration settings, link the Attachment to the necessary Salesforce object. To do this, set the Parent ID to Link, and a dropdown list will populate with all the objects the Attachment can be linked to. Lastly, link the Attachment to the File Upload field on the form. To do this, set the File Name and Body to Field. Then, select the File Upload field from the list of fields.
Now you should be all set! When a form is submitted, the uploaded file will appear as an attachment under the linked object.
#2: Can we create new leads or update existing leads under a Salesforce campaign?
Yes! To create new leads under a campaign, add a Lead object and a CampaignMember object to your form through the Formstack Salesforce integration settings (go to Settings > Salesforce > Objects > Select Object).To attach leads to an existing campaign in Salesforce, use the Value mapping option under Campaign Member ID and pre-fill the existing campaign's ID from Salesforce as the campaign value. This ID can typically be found in the URL when viewing the object in Salesforce.If you are linking a lead that does not yet have a Campaign Member ID, we offer a mapping option that allows you to associate the campaign member you're about to create with the lead you're about to create. Under Campaign ID, select Link, and we will take care of the rest!
#3: How do I map a custom object between my form and Salesforce?
First, you’ll want to create the object in Salesforce by going to Setup Admin > App Setup > Create > Object > New Custom Object. Fill in the fields as needed to create the object, and be sure to update the following as shown here:
- Allow Sharing > ON
- Allow Bulk API Access > ON
- Allow Streaming API Access > ON
- Deployment Status > Deployed
Updating the above settings will ensure that Formstack can view the object for mapping between the form and Salesforce.
Helpful hint: When creating the object (or fields under the object), keep an eye out for any limitations that may prevent the form from submitting data to Salesforce. An example of this is a character limitation on the field set in Salesforce. If your form is submitting a Long Answer field to a Salesforce field with a character limitation, the submitted data may be over the set limit in Salesforce and get rejected. To correct this, set no limit or a very high limit on the Salesforce field.
Once the custom object is created, saved, and live in Salesforce, you can refresh your Salesforce object listing in Formstack to pull the newly created object and display it for mapping. Select the object, and it will be added to your mapping queue where you can choose which field(s) from the form will be mapped into the fields under this object.

#4: Are we able to test a form’s Salesforce integration through a Sandbox before going live?
Definitely! When you add the Salesforce integration to your form, you will be presented with different Run mode settings. Here, you have three options:
- Choose ON, and submitted data will be sent to your live Salesforce instance.
- Choose TEST, and submitted data will be sent to your Salesforce Sandbox environment.
- Choose OFF, and nothing will be sent to Salesforce when the form is submitted.
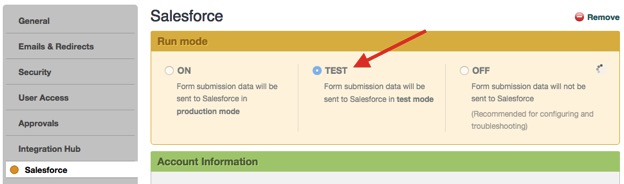
To run in Sandbox mode, set the integration to TEST, then enter your Sandbox login credentials and map the form to Salesforce as needed. When the form is submitted, the data will be sent to Salesforce Sandbox, and objects will be created or updated as needed. When testing is complete, change Run mode to ON and update your Salesforce credentials to reflect your live Salesforce account.
Note: If you turn the integration to ON and do not update your credentials, the integration will not be able to run and no data will be sent to Salesforce.
Want to learn more about Formstack’s Salesforce integration? Click below to access our essentials guide.

