


"Here to Help" is a support column written especially for Formstack's awesome, loyal customers.
Did you know it’s possible to autofill form fields on a Formstack form? It’s true! You can manipulate your form’s URL to pre-populate field data before a user ever starts filling out the form.You have two options for pre-populating fields:
- You can pre-set the exact data you want entered into a form field.
- You can set form fields to pull data from another form the user has just completed.
No matter which option you choose, the fields you designate will be filled out automatically when someone visits your manipulated form link. This is a great way to save users’ time (and boost conversions!) or to add something to the form for your own records (such as the domain where a user originated). Learning to autofill forms can be a bit cumbersome, but it’s definitely worth it if you use a lot of forms that are visited by repeat customers, such as order forms, surveys, or lead gen forms. To help you get started, here are step-by-step instructions for building a URL that will autofill form data for your users:
Step 1: Open a Word Processor Doc or Note
You’re in luck! This first step is super easy.As you work to build a form URL to autofill form fields, you’ll need to gather a few different pieces of information. So it’s a good idea to start by opening a word processor or text doc that can house all the parts of the URL until you are ready to assemble them.
Step 2: Find the URL of the Form You Want to Pre-Populate
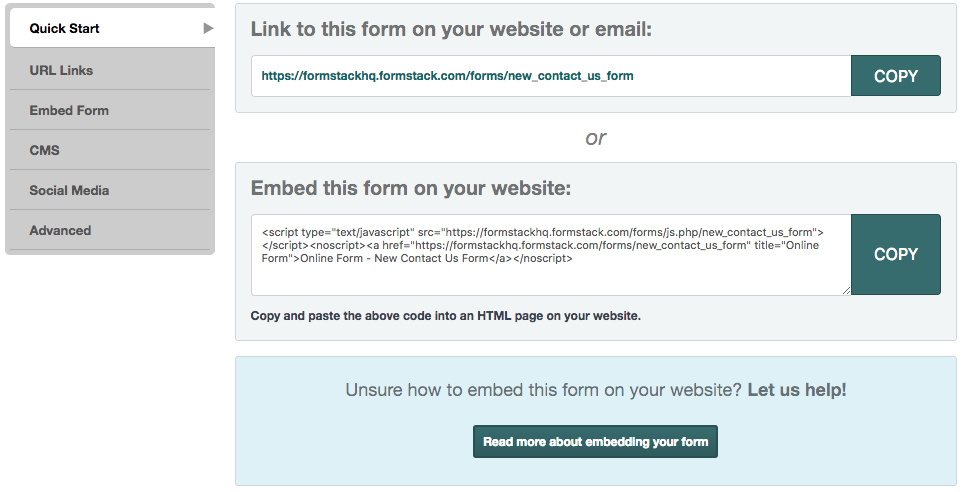
Next, you need to figure out the URL of the form you want to pre-populate. This URL will serve as your starting point (i.e., it is the URL you will be manipulating).To find the appropriate URL, go into the Formstack form you want to pre-populate and open the Publish tab. You will see your form’s URL at the top of the screen under Link to this form on your website or email. Copy that URL (via the large COPY button on the right) and paste it into your word processor doc for later use.
Step 3: Decide Which Form Fields You Want to Pre-Populate
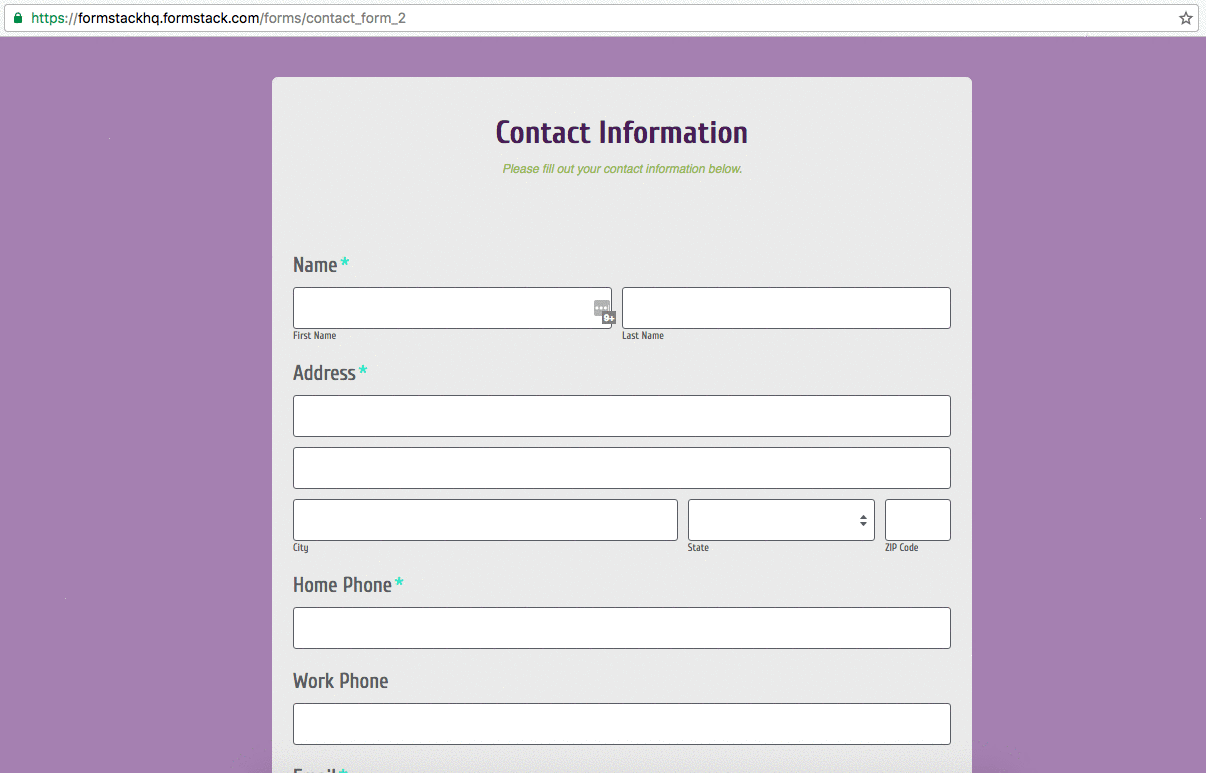
The next step is to figure out which fields you would like to autofill for your users. You can autofill any number of fields—just be aware that your URL will end up pretty complicated if you do too many.As an example, we will autofill form data for the Name and Email fields shown below.
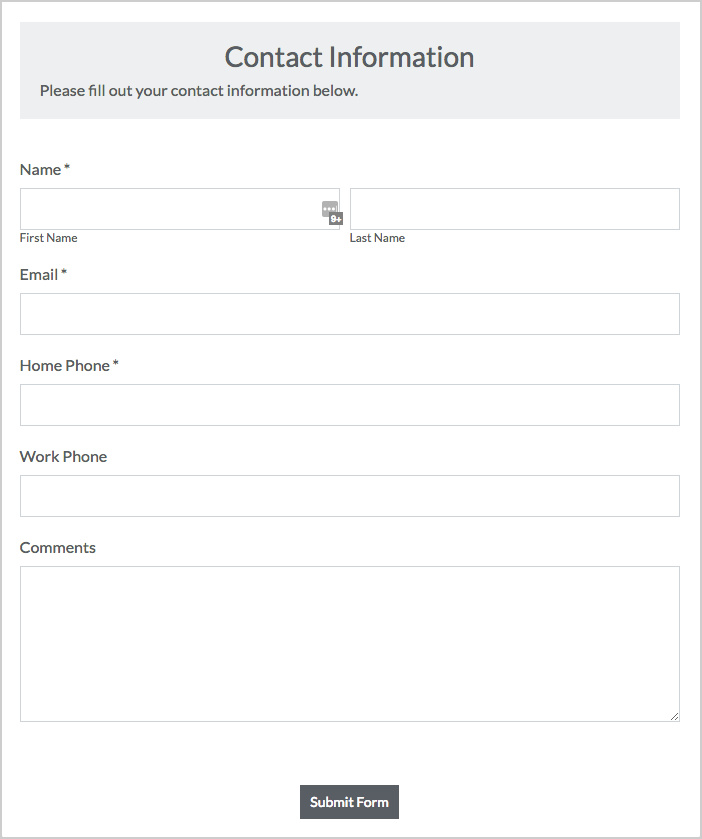
Once you decide which fields you would like to pre-populate, copy the field labels into your word processor. Be sure to copy the labels exactly; if there are any misspellings in the final URL, the fields will not populate correctly.For our example, the field labels are Name and Email. However, because the Name field has subfields for First Name and Last Name, we will need to include those separately. Thus, our field labels become Name-first and Name-last.
Step 4: Determine What Information You Want to Pre-Populate
When you get to this step, you need to answer two questions (but you can only answer “yes” to one of them):
- Do you already know the exact information you want to pre-populate?
- Do you want to pre-populate information from another completed form?
If you answer “yes” to question 1:If you know the exact information you want to populate, this step is pretty easy. For example, if you are sending out a person-specific URL and want to autofill basic information like the person’s name and email (like our example), you should already know the person’s name and email address. So when building the URL, you will simply type that name and email address as you want it to appear on the autofilled form.Another example where you might already know the information you want to pre-fill into the field is if you are sending out an event form and want to autofill the event name or a special event code.
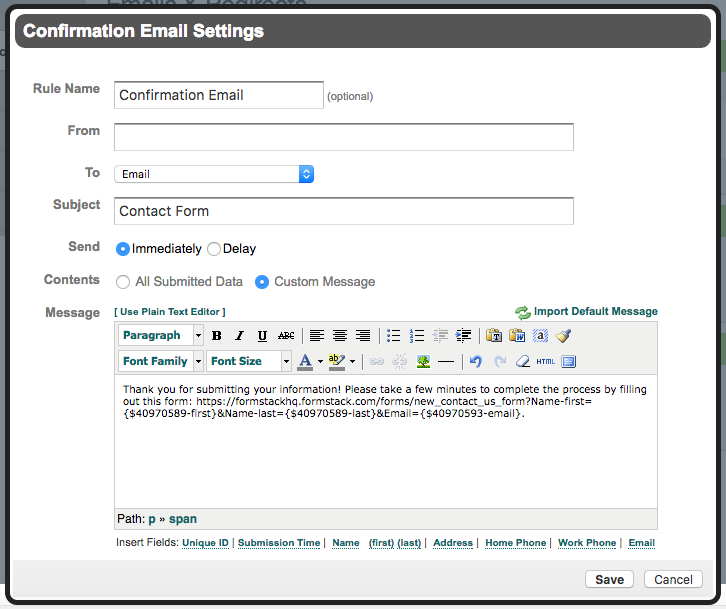
If you answer “yes” to question 2:If you want to autofill form data by pulling information from a completed form, it’s a bit more complicated. For example, if you need the same user to fill out several forms but don’t want that person to have to duplicate basic information (such as name and email), you will need to do more work when building the URL. Instead of typing the exact information you want to pre-fill into the field, you will need to use the field IDs from the original, completed form. Additionally, the URL with the appropriate field IDs must be accessed via a submit action or a confirmation email. (In other words, to pull information from one form and populate it into another, you have to provide a user with the manipulated URL to the second form right after that user submits the first form.)To find the appropriate field IDs, go into the form you want to pull information from and open a custom confirmation email. You can do this by following these steps:
- Go to Settings > Emails & Redirects.
- Find the Confirmation Emails section in the middle of the screen and click the text that says Click here to add one.
- When the Confirmation Email Settings box pops up, select the radio button next to Custom Message in the Contents section near the bottom of the screen.
Now, if you click on any of the fields underneath the message box, the IDs for those fields (plus the label name) will be populated into the message box, as shown below.
Note: Since the Name field has subfields for First Name and Last Name, you will want to use those subfield IDs rather than the main Name ID.

You can then copy those IDs into your word processor for later use.
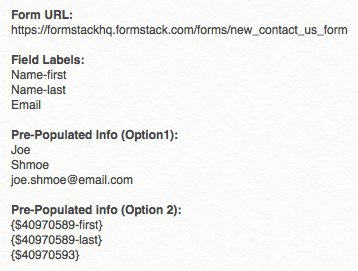
Note: You will first want to delete the label name that appears after the space inside the brackets so that you are left with just the field ID. For example, the ID for the First Name subfield above would be {$40970589-first}, and the ID for the Email field would be {$40970593}.
Step 5: Assemble the URL
Once you’ve gathered all the information needed for the pre-populated URL, go back to your word processor doc and start building!You should have notes that look something like this:
To build your URL, insert your information into the general formula below. If you know the information or value you want to populate, simply plug in the known data directly where it says “Pre-Populated Info.” If you are pulling that information from another form, plug in the field IDs instead.
Form URL?Field Label 1=Pre-Populated Info 1&Field Label 2=Pre-Populated Info 2&Field Label 3=Pre-Populated Info 3
To make sure you enter your information correctly, keep these notes in mind:
- The symbols ?, =, and & are used to separate the various pieces of information in the URL. The ? indicates the start of your query string. The = separates the field labels from the autofilled form data. And the & separates each section of field information from the next.
- Any spaces in the URL will break it up and cause it to malfunction. If your field label contains a space (e.g., if it’s “Job Title”), you will need to replace the space with an underscore (e.g., Job_Title). If your pre-populated information contains a space (e.g., Marketing Specialist), the space should be replaced with a plus sign or a “%20” code (e.g., Marketing+Specialist).
Here is how your final URL should look if you know the information you want to populate:
https://formstackhq.formstack.com/forms/new_contact_us_form?Name-first=Joe&Name-last=Shmoe&Email=joe.shmoe@email.com
Here is how the URL should look if you are pulling the information from another form:
https://formstackhq.formstack.com/forms/new_contact_us_form?Name-first={$40970589-first}&Name-last={$40970589-last}&Email={$40970593-email}
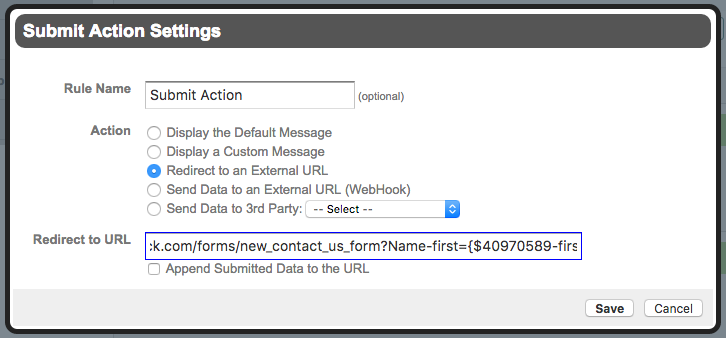
Note: To get the form to pre-populate correctly using the URL with field IDs, you have to send it out via a submit action or a confirmation email. View the animation below to watch Joe’s name and email pre-populate onto a second form when the URL is set up as a redirect submit action (so that the user is immediately directed to a second form upon submission of the first form).
Step 6: Share the URL
After you’ve finished building your custom URL, it’s time to share it! If you know the information you want to pre-populate for users, you can share the custom URL any way you want—such as by sending the link directly in an email or instant message. If you are pulling information from another form, you must share the link through a confirmation email or submit action on the original form.To share the link via a confirmation email or submit action, go into the original form and select Settings > Emails & Redirects. To add the link to a confirmation email, select Click here to add one” in the Confirmation Emails section, select the radio button next to Custom Message, and paste the URL into the message box however you see fit.
To add the link to a submit action, select Click here to change in the After the Form is Submitted section. Then select the radio button next to Display a Custom Message or Redirect to an External URL, and paste the URL in the appropriate location. If you choose to include the URL as part of a custom message, it will display on the Thank You page after a user has submitted the original form. If you choose to use the URL as a redirect submit action, your user will automatically be directed to the second, pre-populated form upon submission of the first form (as shown in the animation in the above section).
Want to learn more about pre-populating form fields? Click below to watch a video tutorial of the process.

