


Who needs this tutorial?
If you love that Formstack Documents is reducing how much paper you create, but you need a way to collect signatures, this tutorial is for you. With Formstack Documents, you can send your merged documents directly to DocuSign to collect signatures. Like our other eSignature integrations, you can send documents out to multiple signers, CC other parties, and collect additional information from the signers.
Today, we’re going to walk you through the step-by-step instructions to integrate Formstack Documents and DocuSign so you can start collecting signatures faster.
Before you get started…
Before you get started, you’ll need a few things.
- An editable template with merge fields ({$FirstName}, {$DealName}, etc.)
- Your Formstack Documents API Key
- Your DocuSign API Key
4 steps to set it up
For this example, we’re going to show you how to create dynamic contracts with data from a Salesforce account. We’ll then show you how to send that populated document directly to DocuSign via a Formstack Documents DocuSign integration.
Step 1: Set up the template for your dynamic contract.
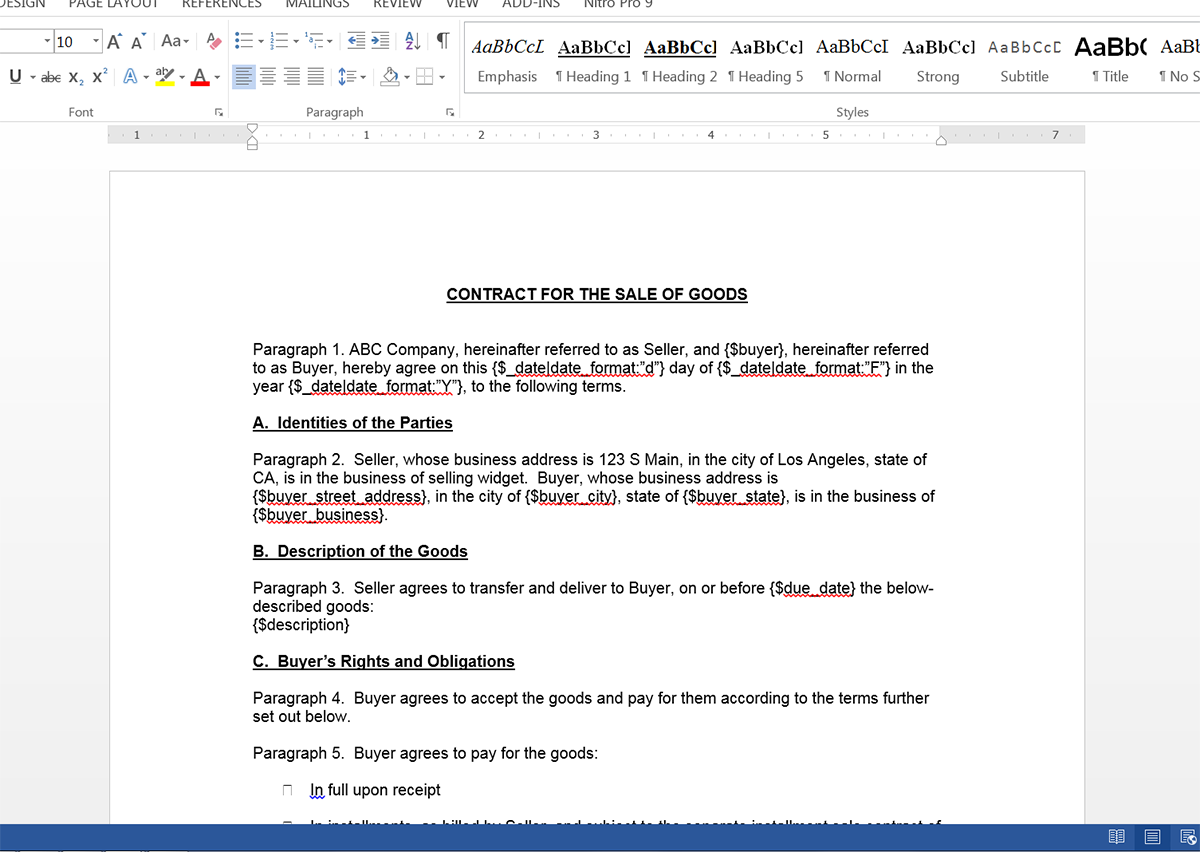
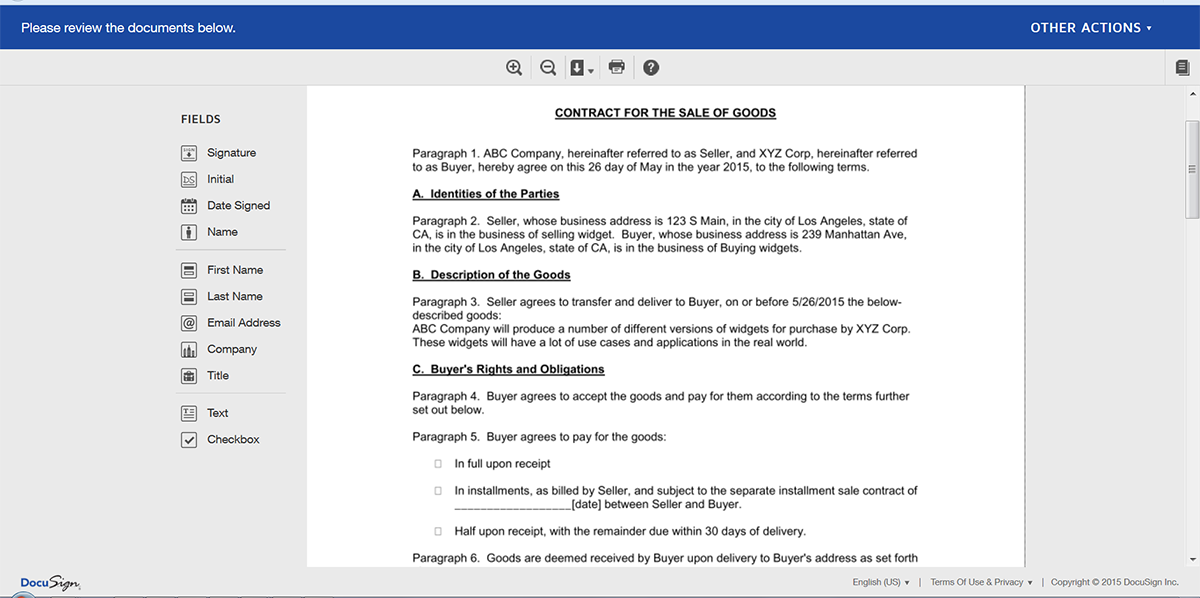
To get started, we’ll need to set up our contract template in Formstack Documents by defining the merge fields where we want Salesforce to populate data. Here’s an example of our contract:
This is great, but a little too simple for a complex contract. To make the contract more dynamic, let’s establish some “if” statements so certain sections only show depending on the state where the customer is located. Here’s an example:
{if $CustomerState == ‘CA’}
Under California Law, we are required to disclose this information. At any time either party is able to terminate this contract without cause. There is a minimum 30 day notification.
{/if}{if $CustomerState == ‘AZ’}
Under Arizona Law, we are required to release this information. At any time either party is able to terminate this contract without reason, but must submit written notice at least 60 days prior to the desired termination of the contract.
{/if}
Step 2: Create a place for the DocuSign signature collection.
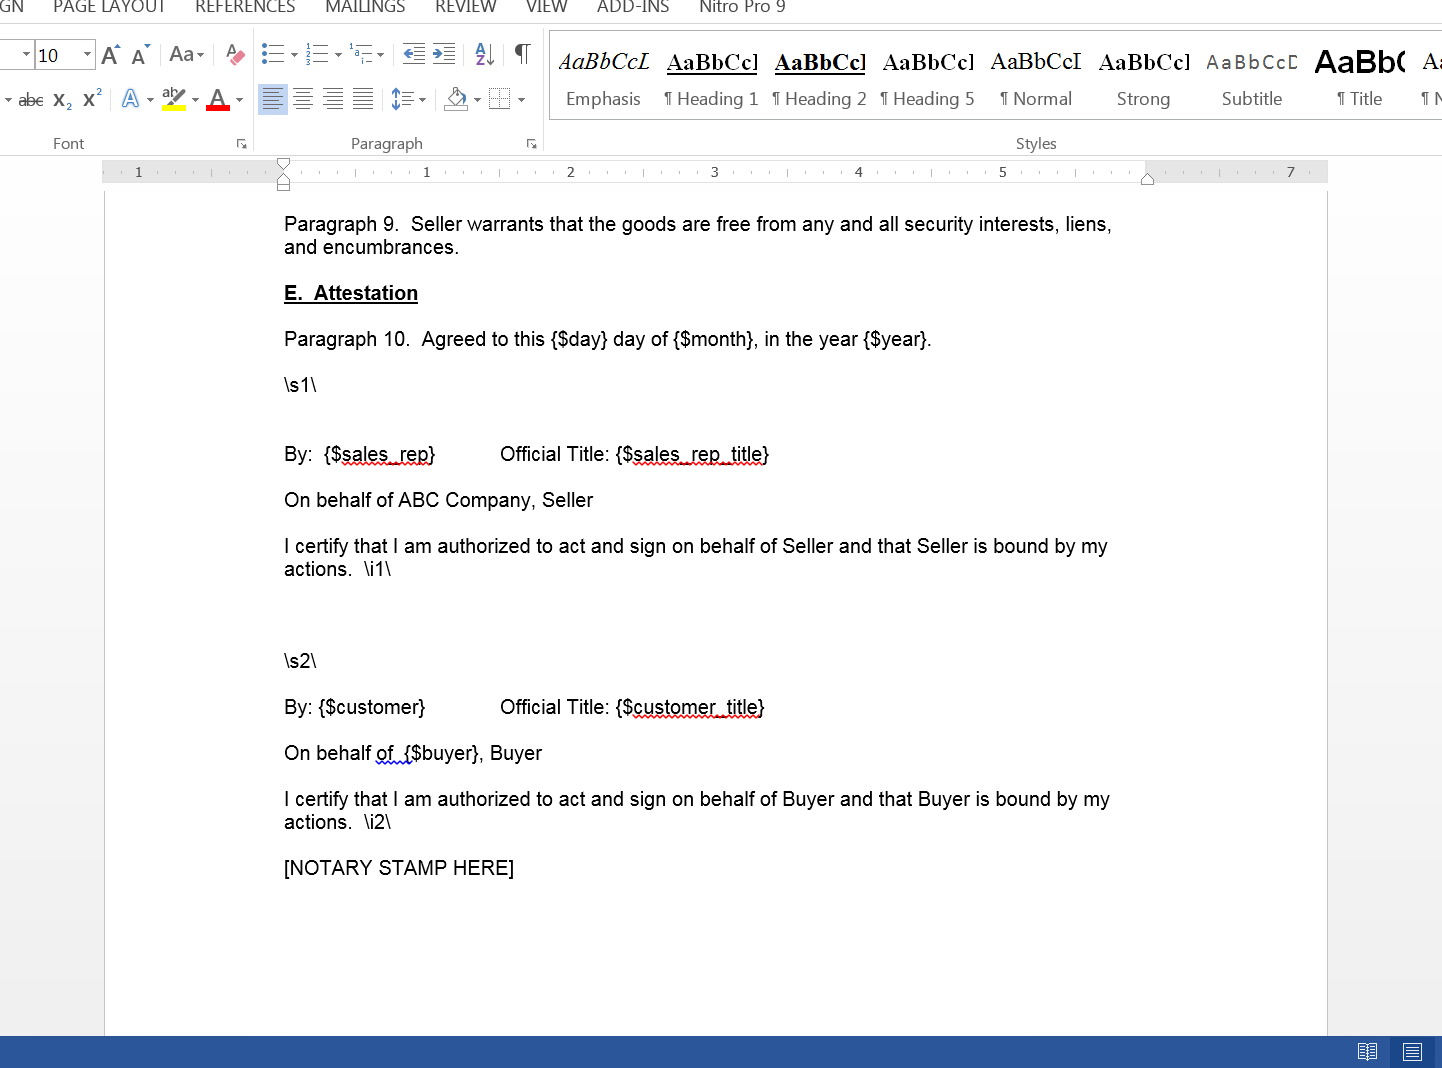
Now, we need to define where we want DocuSign to populate signatures within our contract. We can do this with special text tags defined by DocuSign. In the place where we want our DocuSign signatures to appear, we’re going to add anchor tags like: \s1\ and \s2\.
If the background of your document is white, you’ll want to change the font color of your anchor tags to white in order to hide them in the generated document.
Note: If you’re using a PDF file, you’ll need to add the signing tags as text in the PDF, not inside text boxes.
Here’s a comprehensive list of anchor tags you may want to use:
Description
Short Tag
Long Tag
(Turn on under More Options)
Signature
\s1\
\signature1\
Initial
\i1\
\initial1\
Date
\d1\
\date1\
Name
\n1\
\name1\
Title
\t1\
\title1\
Attachment
\attachment1\
\attachment1_2\
\attachment1_3\
\attachment1_req\
\attachment1_2_req\
\attachment1_3_req\
\attachment1\
\attachment1_2\
\attachment1_3\
\attachment1_req\
\attachment1_2_req\
\attachment1_3_req\
Text Box
\tbx_1_text\
\tbx_1_2_text\
\tbx_1_3_text\
\tbx_1_text_req\
\tbx_1_text\
\tbx_1_2_text\
\tbx_1_3_text\
\tbx_1_text_req\
Checkbox
\cb_1_yes\
\cb_1_2_yes\
\cb_1_3_yes\
\cb_1_yes\
\cb_1_2_yes\
\cb_1_3_yes\
Radio Button
\rb_1_1a\
\rb_1_1b\
\rb_1_1c\
\rb_1_1a\
\rb_1_1b\
\rb_1_1c\
If you need to add additional anchor tags, you can customize them using custom JSON settings in your DocuSign delivery under "More Options.” Below is an example of the anchor tag / JSON format (you can find the settings in DocuSign REST API Documentation).
{"signer1":
{"tabs":
{"signHereTabs":[
{"anchorString":"\\s1\\","anchorIgnoreIfNotPresent":"true"}
],
"textTabs":[
{"anchorString":"\\tbx_1\\","tabLabel":"Text 1","anchorIgnoreIfNotPresent":"true","required":"false"},
{"anchorString":"\\tbx_2\\","tabLabel":"Text 2","anchorIgnoreIfNotPresent":"true","required":"false"},
{"anchorString":"\\tbx_3\\","tabLabel":"Text 3","anchorIgnoreIfNotPresent":"true","required":"false"}
]
},
"signer2":
{"tabs":
{"signHereTabs":[
{"anchorString":"\\s2\\","anchorIgnoreIfNotPresent":"true"}
],
"textTabs":[
{"anchorString":"\\tbx_4\\","tabLabel":"Text 4","anchorIgnoreIfNotPresent":"true","required":"false"},
{"anchorString":"\\tbx_5\\","tabLabel":"Text 5","anchorIgnoreIfNotPresent":"true","required":"false"},
{"anchorString":"\\tbx_6\\","tabLabel":"Text 6","anchorIgnoreIfNotPresent":"true","required":"false"}
}
}
}
Once you’ve finished adding merge fields to your contract template, you’re ready to upload to Formstack Documents and move on to the next step!
Step 3: Connect to DocuSign.
Now we’re ready to connect to DocuSign and start collecting signatures!
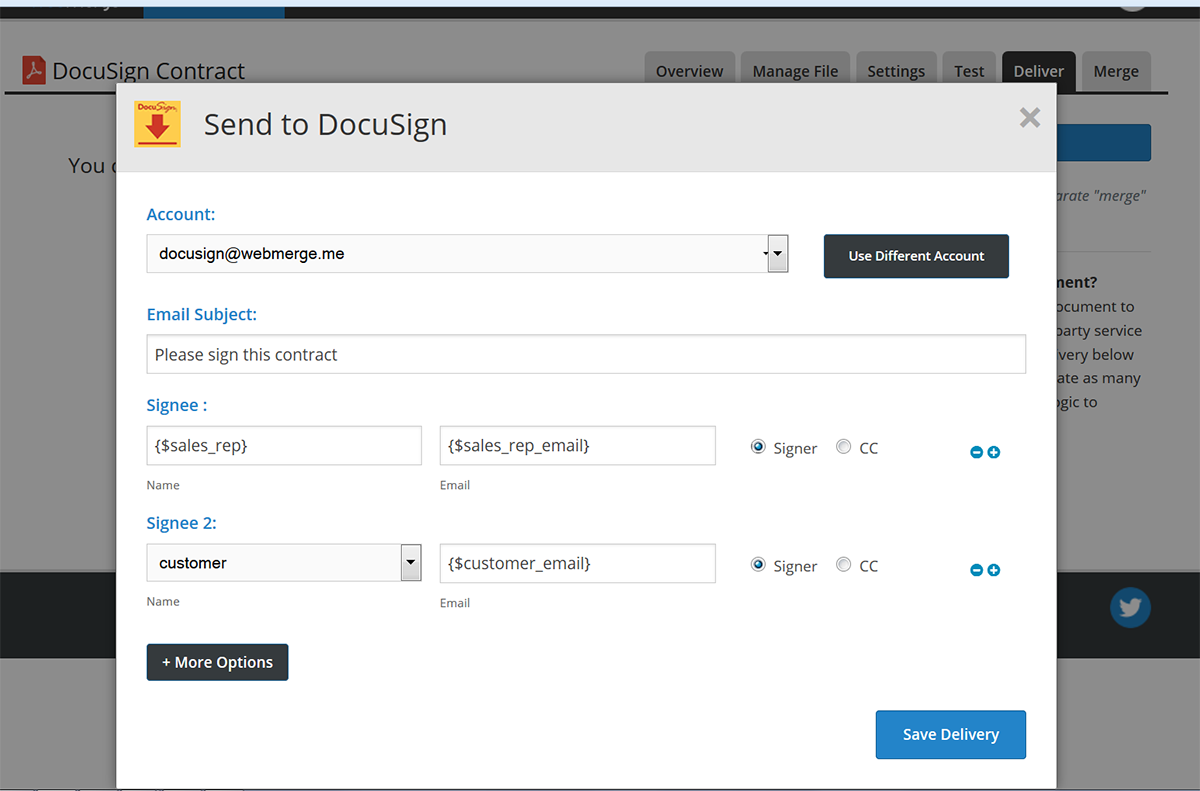
After you’ve set up your document with Salesforce, navigate to the “Deliver” tab and set up a “New Delivery.” Choose DocuSign.
Next, you’ll need to log in to your DocuSign account. Once you enter the correct login information, the page will refresh, and you should see the options to set up signers. Select the name and email address for the clients you’d like to sign this contract.
Step 4: Connect to Salesforce (or another third-party data collection tool).
Once you have DocuSign set up, our last step is going to be connecting to the tool we want to use to populate our document before it is signed. For this example, we’ll be connecting with Salesforce and using the Formstack Documents managed package to integrate our Salesforce org with Formstack Documents. Inside the package, we’re going to set up a “New Formstack Documents Mapping” for this contract. We are going to hook up the mapping to our Opportunity object and select our New Contract from the document dropdown.

Next, we’ll match the merge fields in our documents to the fields in our Salesforce org. Here’s what our finished mapping looks like:
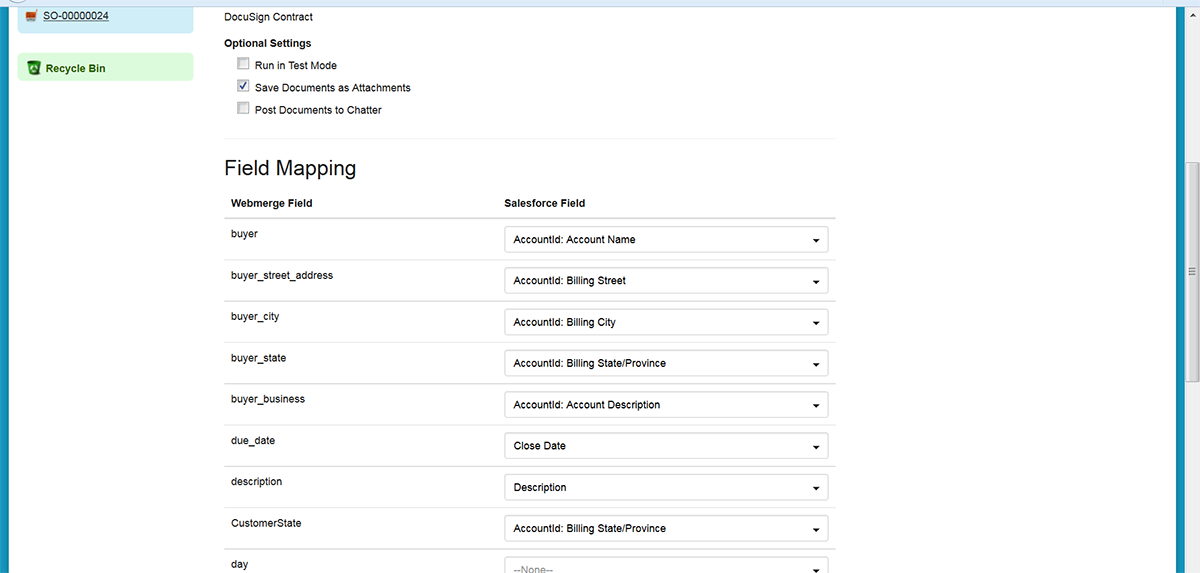
Now, we can save and activate our mapping so it’s accessible to our Salesforce users.
Now it’s time for a quick test! Using a test opportunity, we’ll click the Formstack Documents button that appears on the record. Then, we’ll select the mapping we just set up. This will send the Opportunity information over to Formstack Documents and generate the contract before sending it to DocuSign. In just a few minutes, our clients (or test account) will receive an email with a link to sign the document.
Isn’t that easy? Once your document has been signed, you’ll receive a final copy of the signed contract by email. Now, you can start using Formstack Documents and DocuSign to populate all kinds of documents! Check out the video below to learn more about leveling up your document generation process with Formstack Documents.

