


In this day and age, many processes are driven by automation. From sending emails to driving cars, much of our day-to-day can be easily automated to some extent to make our lives a little bit easier.
Did you know you can do the same with Formstack? By adding the Workflows feature to your Formstack Forms, you can quickly and easily automate many time-consuming form steps and tasks with just a few clicks.
You can use Workflows to create dynamic form processes that help you stay organized while powering your business. Workflow Forms capture data through multiple steps, and each step can be assigned to a different participant. This automation saves time, eliminates repetitive tasks, and creates a seamless data collection process across departments.
Whether Workflows is a new tool to you or you’ve been using it for years, there are some tips, tricks, and pointers that may surprise you.

Start Here: If you’ve never heard of Formstack Workflows, watch this webinar to get all the details on this helpful tool before jumping into the nitty-gritty details.
1. Use Templates
Yep, Workflow Forms help streamline your processes, but maybe you’re not sure where to start. Formstack provides a variety of templates to help get you moving. You can change them up as needed, but it’s great to have some examples for a jumpstart.
Categories include Education, Healthcare, and HR, to name a few. For example, the College Application Workflow contains a section for the student to fill out information like grades, extracurricular activities, etc. The next section of this workflow routes to the Office of Admissions for approval or denial of the applicant. If the applicant is accepted, the workflow will route to Financial Aid for approval.
Let’s check out the New Patient Registration Workflow template. This workflow starts with data entered by the patient and then routes over to the receptionist for input. After the receptionist has finished, the workflow routes to the nurse and doctor. It’s so nice to have everything set up for an easy voyage through different departments so you can worry less about paperwork.
Related: Use These Workflows to Help Your Team Work Smarter, Not Harder
2. Control Submission Access
Alright, so you’ve got your Workflow Form up and running and collecting submissions. But what if there’s a period of time that you want to turn off submissions for your workflow? You can easily update the status at any time. In the Workflow Editor, there are three options for this:
- Active and accepting submissions
- Active and not accepting submissions: This means that any in-progress workflows can finish up, but new ones can’t start.
- Inactive: This will stop any new data from being collected, even from in-progress workflows.
These status options make it easy to control the flow of data through your workflow. At any point in time, you can quickly make an update to ensure the process is working as needed.
3. Send Your Data to Formstack Documents
Take your forms automation one step further by adding document generation to your workflows. Formstack Documents makes it simple and easy to automatically generate polished, professional documents using data pulled directly from your forms.
If you’re using Formstack Workflows and Documents already, you might think you have to wait for the workflow to be completed before sending any data to Documents. Surprise! All you need to do is set up a connector to enable data transfer from any workflow step into Documents.
After you’ve set up the Documents integration under Settings, the Connector icon will appear in the Workflow Builder between every step. This allows you to pick and choose the steps where the Documents integration will run. You can also choose to send data to Documents only when the workflow is complete.
When you’re ready, make sure Run Mode is set to On. Once that step completes, the data is sent to Formstack Documents based on your mapping.

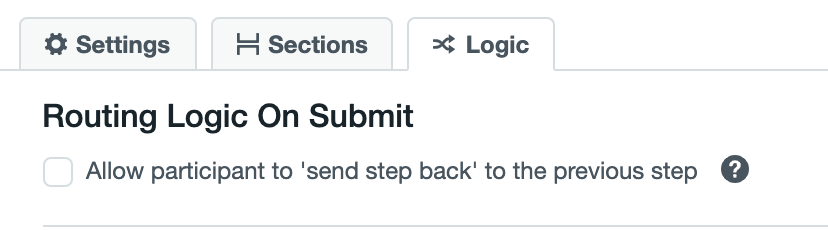
4. Send Information Backwards
Let’s say Participant 3 notices some information is incorrect and needs to send the form back to Participant 2 for some corrections. Can do!
In the Workflow Builder, check the "Allow participant to 'send step back' to the previous step" option on the steps where you want to allow this action. When selected, a ‘Send Step Back’ checkbox will appear to the participant. There may be certain steps where you don’t want the participant to be able to send it back, in which case you would leave the option unchecked.
If the participant sends the form back, that person can add a comment explaining why. This message will then display in the assignment email sent to the previous participant, providing a space for clear communication. And the previous submitter won’t have to complete all of the fields again! That form will be prefilled when it’s sent back, ready for any updates or corrections.

5. Assign a Participant Based on the Email Field
Users uploaded to your account will appear in the assignment dropdown on each step in the Workflow Editor. You can assign a user to a step using this dropdown, or you can choose to assign a user based on a field on your form.
For example, if you add a list of managers on your form, you can set the next step to be assigned to whichever manager has been chosen from that list. This option can simplify setting up your assignments and minimize manual work on the backend.
Read Next: What You Need to Know about Workflow Users
Work Better with Workflows
There you have it! Workflow Forms are a great way to eliminate repetitive processes and offer a lot of flexibility based on your specific needs. Whether you want to keep it simple or add more complexity, a Workflow Form will save time throughout your day.
Learn more about our robust Workflows tool and how it can help you streamline your everyday work so you can accomplish more on your to-do list.

