


Organizing events and selling tickets online has never been easier with great services like Eventbrite. Easily send out invitations, collect registrations, collect payments, and even online check-in. However, they don’t really offer a way to send the registrants a customized ticket for the event. Sure, they send out an automated ticket, but it’s pretty boring. Get your attendees excited about your event with a nice-looking ticket and even put your sponsors on the ticket!
Here is a quick and easy way to send a customized ticket to your attendees using Formstack Documents.
First, you’ll want to setup your ticket within Formstack Documents. Depending on what information you need on the ticket, we suggest using a fillable PDF so you can be sure the formatting looks really nice. However, if you will be putting in any dynamic images (a barcode maybe?) you will have to use the “Build Your Own” document. Once you get your ticket all setup and tested, let’s go grab our attendee info from Eventbrite.
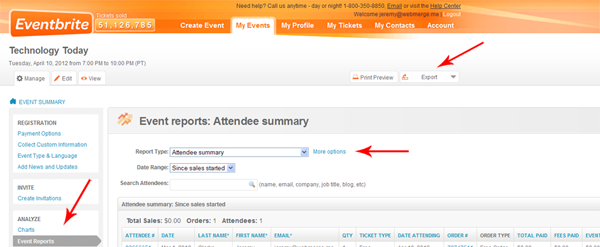
Currently, Eventbrite doesn’t offer a way to “push” data out of their system automatically so we are going to use their Export to CSV functionality. In your Eventbrite account, go to your Event Summary page, and click on Event Reports. On this page you can customize a lot of the data that you see (and will be exported) by clicking the More Options link next to the Report Type. Once you have generated the report, go ahead and choose the Export option located toward the top of the screen and choose the CSV option. Save the file on your computer, we’ll need it in a bit.
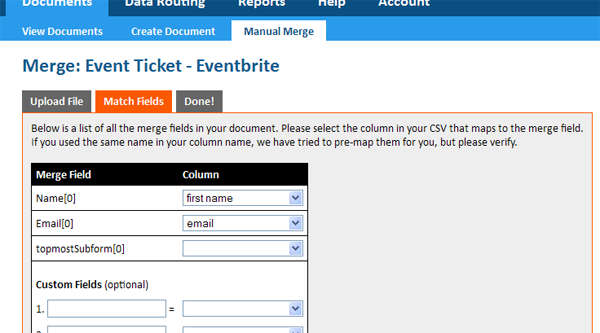
Now back in Formstack Documents, we’re going to do a Manual Merge for the ticket that you created. The easiest way to do this is to click the Merge link on the My Documents page. The next step will ask you to upload the CSV file that you just generated from Eventbrite. After uploading the file, it will generate a field map – go ahead and map the fields you created in your ticket to the fields in the CSV. Once you have everything mapped, click the Merge button and you’re done!
Make sure you included an email address on your ticket (or use the Custom Field option when merging) and tie that email address to the email notification settings or your attendees won’t receive the ticket!

