


“Here to Help” is a support column written especially for Formstack’s awesome, loyal customers.
Let’s face it: if the online forms on your site don’t have a branded and professional look, people will be less likely to fill them out. Luckily, Formstack’s Theme Editor was designed to help with most of your form customization needs—including countless options for colors, layouts, images, and fonts—without the hassle of CSS. But if you want to make more advanced edits to your forms, we also provide a handy CSS Editor.
In this post, I’m going to break down all the essential information you need to know about using form CSS with Formstack, including my top three CSS hacks! Ready to dive in? Let’s get started.
Form CSS: The Basics
CSS (Cascading Style Sheets) is a code language that can be used to style online content like web pages and forms. With this code, you can tweak elements like fonts, colors, spacing, and layout. In the Formstack app, you can use the Advanced Code Editor to make CSS changes to your forms. First, open your form, select the Build tab, and click on Theme (at the bottom of the builder, in between Fields and History). From there, select Edit Theme.
Note: If you are using a Default Theme, be sure to make a copy of the theme before making any edits.
When you scroll down in the Theme options, you will see the Advanced Code Editor. Once you are in the Advanced Code Editor, you can choose the CSS tab to edit your form CSS. After you have completed any edits to your form, be sure to scroll to the top of the theme editing section, and click Save to make the code changes stick! This is how my CSS will look inside the Advanced CSS Editor:

Note: To save your CSS changes and apply them to your current theme and form, select Save and Activate. The changes will NOT reflect on your form without this step.
Now that you know how to access the CSS Editor, here are three of my top hacks for CSS form customization!
Hack #1: Edit the Description Area Field
Using CSS form customization in the Description Area field lets you insert rich text (like images, formatted text, and links) into your forms. Here are a few ways you can use CSS to tweak these fields:
Edit Line Height and Spacing
Modifying line height and spacing in the Description Area is one of the most common CSS questions that our Customer Support team gets. Use this code to make those changes:
.fsBody p { line-height: 15px}
Edit Tables in the Description Area
By default, tables in the Description Area field have no borders:

You can add borders and modify column widths for tables in the Description Area by using the following code:
.fsBody table td {border-color: black;border-style: solid;border-width: 2px;width: 25%;}

Hack #2: Modify the Submit Button
The submit button is an important element on your form. If it doesn’t stand out, people won’t submit your forms!There are many different ways you can edit your form’s submit button using CSS. Here are a couple form CSS examples:
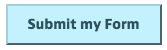
Use a Custom Image for the Submit Button
To use a custom image as your submit button, paste the CSS shown below into the CSS Editor, and replace the background URL with the link to the image you'd like to use.
.fsSubmit input {background: url(http://www.YOUR_IMAGE_LINK_HERE.png) no-repeat scroll 0 0 transparent !important;border:medium none !important;height: 100px !important;margin: 0 !important;padding: 0 !important;width: 300px !important;text-indent: -9999px !important;}
You may need to adjust the height (height: 100px;) and width (width: 300px;) to the dimensions of your image. Once you save these changes, the new submit button will show up on your form.
Left Align the Submit Button
Left aligning your form’s submit button can also be accomplished through CSS. Just enter the following code in the CSS Editor:
.fsPagination {margin:25px 0 0 22px;text-align:left;}
Remove the Submit Button
Occasionally, our users request to remove the submit button from their site. These requests typically come from customers that have built some sort of form calculator using our service. To accomplish this, add the following code to the page where you embedded the form (or to a style template):
.fsSubmit input.fsSubmitButton {display:none;}
Alternatively, you can remove the URL from the custom submit button code in the CSS Editor.Here are a few other examples of submit buttons that use CSS (and if you want to use any of them on your forms, just copy the code from this page!)


Hack #3: Modify the Thank-You Page
Your thank-you page is another important element of the form submission experience. Here are a few ways you can customize this page with CSS!
Change the Background Color of Your Thank-You message
If you want to change the background color of the thank-you message without changing the color of your form section headers, enter the following code into the CSS Editor on your form:
.fsBody .fsForm .fsTable .fsSectionHeader { background-color: #7BC143; }
Replace the HEX code above with the color of your choice.
Change or Delete the Checkmark Icon
To use your own image in place of the checkmark on the thank-you page, enter the following code:
#fsSubmissionCheckmark {background: url(http://www.YOUR_IMAGE_LINK_HERE.png) no-repeat scroll 0 0 transparent;
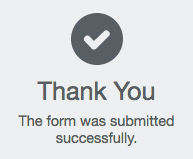
border: medium none;height: 100px;margin: 0;padding: 0;width: 300px;}
Again, replace the background URL in the code above with the link to the image you'd like to use in place of the checkmark.And to remove the checkmark all together, use this code:
#fsSubmissionCheckmark { display: none; }
Additional Information
- If you’re new to CSS form customization with Formstack, our Custom Form Themes and CSS Guide is filled with form CSS examples, and will be a great resource to help you get started. Once you’re comfortable with form CSS, you can modify and save a theme, and apply those changes to multiple forms on your site.
- Keep in mind that using custom CSS in the Advanced Code Editor will override any settings you make in the Quick and Advanced Styles sections.
- You can turn on “No CSS” for your Javascript embed code to take the CSS styling from your site.
Want to learn more about Formstack’s custom theme options? Click below to check out other ways to beautify forms without CSS.

