


“Here to Help” is a support column written especially for Formstack’s awesome, loyal customers. Formstack’s drag-and-drop form builder is easy to use, but do you find yourself reusing certain form fields every time you build a new form? If you’ve built multiple forms with a similar purpose or audience, there’s a strong chance that you do.While dragging one basic field onto your form will only take a few seconds, it can become time consuming when you’re adding the same fields to multiple forms over time (especially when any of those fields are customized with text and options).Formstack’s Saved Sections feature is a great solution to this problem. The aptly named feature will, indeed, allow you to save the sections you’ve created to reuse on other forms; and more importantly, it will save you time by helping you streamline your form building!
Overview
If you’ve ever created a form with multiple pages or columns, you’ve definitely used a section on the form. If you haven’t, creating your first section is a cinch.
- In the form builder, start by dragging a new section (found under “Structural Fields”) onto your form. This will add a “Blank Section” to your form.
- Select the blank section to customize the heading, create up to four columns for different form fields, or choose to start the section on a new page of your form.
- Then, simply drag and drop fields into the section. For example, if you frequently collect payments on your forms, you might create a section with the Name field, Address field, Email field, and Credit Card field.
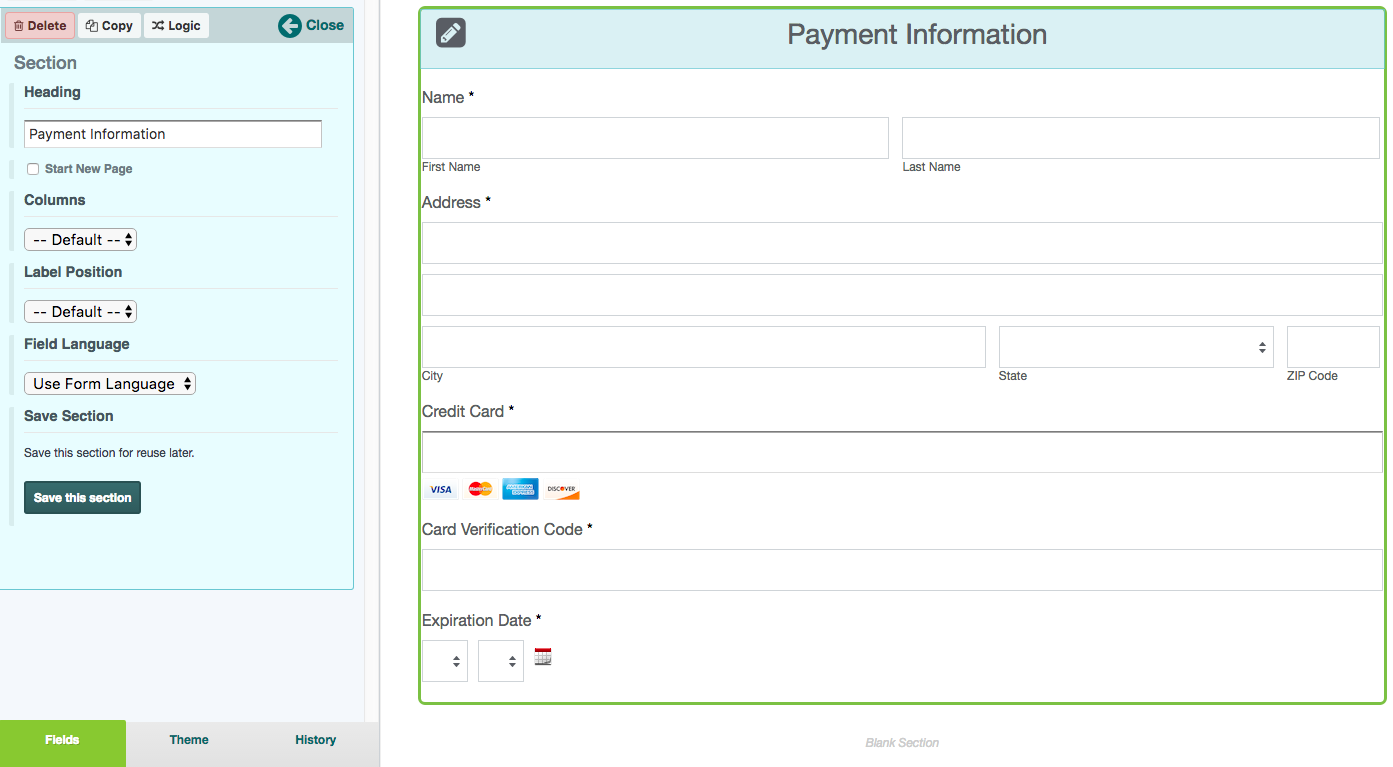
Once you’ve created a section, select the “Save this section” button and store it with a name that you’ll easily remember for future use (like Payment Information or Contact Information).To use the section on other forms, you can find it under the Saved Sections area of the form builder. Simply drag and drop it onto your form the same way you would a regular form field. Saved Sections are a great way to avoid duplicating work so you can streamline your form building and workflow management.
Examples
Before I give a few ideas on ways to use Saved Sections on your forms, here are the three main formatting options the feature offers:
- Add headings or descriptive text to a group of fields
- Create a form with multiple pages
- Use columns to change the layout of fields in a section without changing the rest of your form
Now that you understand how to create Saved Sections and use them to customize the look of your form, here are a few examples of sections that you could save to use on multiple forms:
- Contact Information: If you want to ask for contact information on your forms, make it a Saved Section. Include name, email, address, and phone fields, or save an additional, more simple section for when you just want to collect name and email.
- Employee Information: Include employee name and email, as well as team and role info. Create reusable multiple-choice fields for manager, department, or location.
- Instructions: If you want a set of instructions on multiple forms, you can write them out once and use them again to ensure consistent wording. This would be useful when including fields like a File Upload that might require some explanation.
- Merchandise Options: If you use multiple forms to collect orders, save a section with fields or lists that would help customize an order (like T-shirt sizes or types of pizza).
- Billing or Payment Information: Create a Saved Section with name, email, shipping and billing address, credit card information, and any other billing requirements.
As you can see, there are many ways to use Saved Sections on your forms. Click here for a few more examples!
Notes
You can edit, copy, delete, or move sections just like you do for form fields. Just click on the section field for those options to appear, and customize your section and form from there. You can also take your time-saving to the next level by creating Saved Lists for multiple-choice fields that you can use on multiple forms.So there you have it! The Saved Sections feature may seem simple, but it can save you tons of time by helping you streamline your form building.Want to learn more about streamlining your Formstack forms with sections? Click below for a step-by-step walkthrough of the multi-page form creation process.

